
I have to teach some folks how to find, isolate, and analyze signals tomorrow, which of course means this is the perfect time to document some quick steps for my own reference. I started the build out from the DEFCON 26 Hardware Hacking Village Kali Live Build. If you don’t have it your mileage may vary… on to the buildout.
Installing Software
I used the following after doing a basic
apt-get update
apt-get -y upgrade
to install all of the tools I’m using in this tutorial. The commands I used were:
apt-get install hackrf gnuradio qt5-default libfftw3-dev cmake dfu-util \
                pkg-config libliquid-dev python3-pip python3-pyqt4 \
                python3-numpy libhackrf0 soapysdr0.6-module-hackrf \
                kali-linux-sdr libgnuradio-osmosdr0.1.4 libgnuradio-fft3 \
                libmirisdr0 libosmosdr0 librtlsdr0 libsoapysdr0.6 \
                python-rtlsdr rtl-sdr rtlsdr-scanner gqrx-sdr gr-osmosdr

mkdir /hwhack/gitclones
cd /hwhack/gitclones

git clone https://github.com/miek/inspectrum
git clone https://github.com/mossmann/qspectrumanalyzer
git clone https://github.com/keenerd/rtl-sdr-misc

pip3 install ./qspectrumanalyzer/

cd /hwhack
wget www.baudline.com/baudline_1.08_linux_x86_64.tar.gz

tar -xvzf baudline_1.08_linux_x86_64.tar.gz
ln -s /hwhack/baudline_1.08_linux_x86_64/baudline /usr/local/baudline

vim /usr/local/hackrf_baudline.sh
chmod +x /usr/local/hackrf_baudline.sh
cat /usr/local/hackrf_baudline.sh
#!/bin/bash
# ./hackrf_baudline.sh
# Credit for creation to https://www.elttam.com.au/
# Pipe HackRF output to Baudline
hackrf_transfer -r - -f ${1} -s ${2} -l ${3} -g ${4} | baudline -reset -basefrequency ${1} -samplerate ${2} -channels 2 -format s8 -quadrature -flipcomplex -stdin
### END FILE ###
Updating the HackRF
Pull down the latest release from the GitHub page, e.g.:
cd /hwhack
wget https://github.com/mossmann/hackrf/releases/download/v2018.01.1/hackrf-2018.01.1.tar.xz
tar -xvf hackrf-2018.01.1.tar.xz
Connect the HackRF One, then:
hackrf_spiflash -w /hwhack/hackrf-2018.01.01/firmware-bin/hackrf_one_usb.bin
hackrf_cpldjtag -x /hwhack/hackrf-2018.01.01/firmware/cpld/sgpio_if/default.xsvf
You should see the three blinky lights on the front cycle and go back to solid, then confirm the new firmware version (as of this article it should be 2018.01.01):
root@hhv:~# hackrf_info
hackrf_info version: unknown
libhackrf version: unknown (0.5)
Found HackRF
Index: 0
Serial Number: REDACTED
Board ID Number: 2 (HackRF One)
Firmware Version: 2018.01.1 (API:1.02)
Part ID Number: 0xa000cb3c 0x00664366
Finding Signal
Finding a signal of interest (assumes at least marginal knowledge of frequency, and appropriate antenna connected). For this list of instructions I used a car fob with a 433 MHz nominal transmission frequency:
root@hhv:~# qspectrumanalyzerFile –> Settings
Backend: hackrf_sweep
Executable: hackrf_sweep
Waterfall history size: 100
Device index: {set as appropriate}
Sample rate: 20000000
(click “OK” to save)
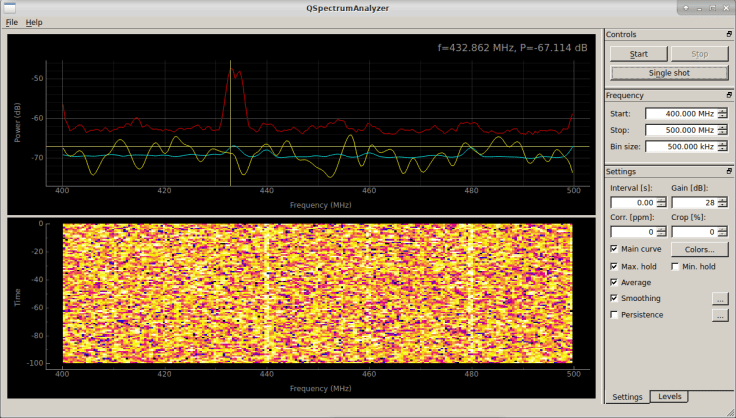
Right pane in “Frequency” section, set start to low end of search and stop to high end of search, for example:
Start: 400.000 MHz
Stop: 500.000 MHz
Bin size: 500.00 kHz
Click “Start” in the “Controls” pane. Recommended to turn on “Max Hold” and “Smoothing” when searching for signals of interest. In my case, that revealed the transmission on 432.981 MHz with a secondary infrequent transmission on 434.651 MHz.
Capturing Signal
Now capture the signal using the hackrf_baudline.sh script:
# Syntax is hackrf_baudline.sh {center frequency in Hz} {sample rate in Hz} {IF gain in dBm} {BB gain in dBm}
root@hhv:~# /hwhack/hackrf_baudline.sh 430000000 8000000 24 20
You’ll see something like the below.
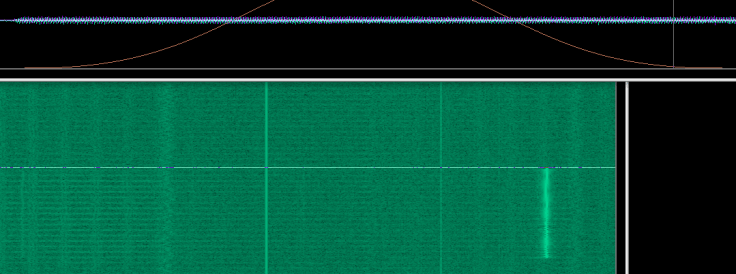
While pressing the fob (or observing the signal) right click on the display and select “Pause” then right click again and select “Output–>Save File As” and save the file as a “.cs8” file. To capture a smaller area for analysis, select the signal of interest and then right click and select “Output–>Save Selection As” and save the file as a “.cs8” file. To confirm capture, you may also right click and choose “Displays–>Waveform” and then move the mouse over an area of the signal to confirm the presence of modulation. Close out Baudline.
Analyzing Signal
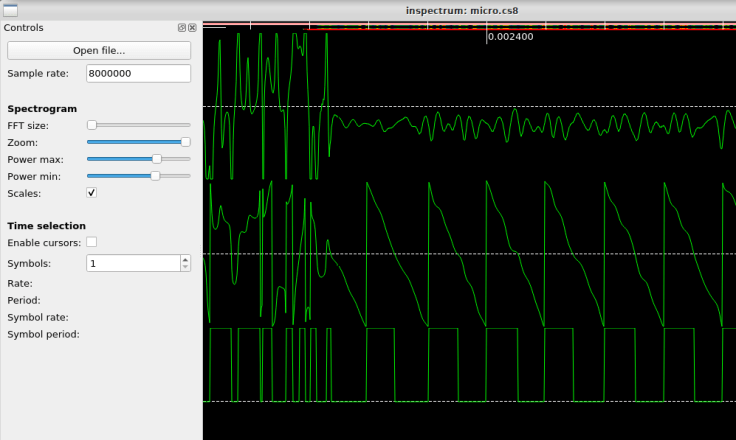
Next, open inspectrum, specifying the sample rate:
root@hhv:~# inspectrum -r 8000000Now click on the Open File and select the saved “.cs8” file from the last step. Set the file type to “complex<int8> HackRF file”. Adjust Power max until the signal just appears (move from high to low). Adjust Power min until the noise just goes away (move from low to high). Right clicking on an area with signal will allow you to add derived plots and work on symbol extraction. Both are beyond the scope of this quick tutorial, but I may publish some analysis methods later.


Leave a comment