So you want to build yourself one of those Pwnagotchi that everyone is talking about since the Flipper Zero came out and no one can get one, eh? And you’ve followed the official installation instructions (which this post supplements, but does not replace) but have noticed that either (1) you can’t really find a Waveshare eInk 2.13″ display that’s not version 3, or (2) you can’t quite seem to get into your Pwnagotchi if it’s even running and ERMAGERD WTF why is this so obtuse? Well, this is the guide for you. 🙂
Let me start off by saying that nothing in this guide is really new. Minor tweaks were made by myself, but more than anything this was created out of frustration that there just doesn’t seem to be a solid “how to” out there anymore since the project was basically abandoned about a year ago. Rather than create a fork and maintain this myself (which I’m actually going to do anyways, but not for anything other than my own messing around), I figured it was best to put together a step-by-step guide from zero to working. There are a lot of little “gotchas” (pardon the pun) that make this a bit more difficult if you haven’t built one already. So, let’s get started!
Preparation Work
Before we go too far, there are a few things that need to be done. You’ve probably already done most of these, but just to be safe you need to purchase/find/acquire/etc the following (and I’m using the most readily available parts list here):
- Raspberry Pi Zero W
- A real time clock (RTC), such as the HiLetgo PCF 8523 or any other I2C-compatible RTC
- A micro SD card, preferably of 32GB or larger size (such as this one) to give your new friend plenty of space for plugins, data, and to eat.. and a way to access it (which is beyond the scope of this document, but a basic USB-based adapter or micro SD to standard SD card adapter are examples)
- A micro USB to (USB A or USB C) cable that supports data transfer (such as this one)
- A mini HDMI to HDMI cable (such as this one) or adapter (such as this one)
- A Waveshare eInk V3 250×122 display (such as this one), which presumably is the reason you’re reading this guide 🙂
- Optionally: A PiSugar or other portable power source (such as this one)
Once you have all of that follow the standard guidance from the Pwnagotchi to flash the image to the SD card, and assemble your Pwnagotchi by:
- Installing (soldering) headers on to the Pi Zero W with the pins pointing up above the HDMI and USB connectors (if they aren’t already present)
- Installing the RTC by following these instructions from Adafruit, and stopping once you complete the physical installation instructions (don’t go into or beyond the “Setting up the RTC Module” section in the link)
- Optionally: Installing the PiSugar or other portable power source (typically to the bottom of the Pi Zero W)
- Installing the Waveshare v3 on top of the Pi Zero W
First Boot
Now it’s time for the first boot. Do the following, in order:
- Make sure the Pi is not powered on (no USB cables connected, and — if installed — the portable power source turned off)
- Insert the SD card into the Pi
- Connect an HDMI cable from the Pi to a display
- Connect a data cable from the USB port closest to the HDMI port on the Pi to your laptop
- Depending on your cable/system this MAY power on the Pwnagotchi… that’s okay 🙂
- If the Pwnagotchi didn’t power on from plugging in the cable, power it on by either turning on the portable power source (if installed) or attaching a second cable to the power port (the USB port furthest from the HDMI port)
Observe the boot sequence as the Pwnagotchi starts up. It will (likely) resize the partitions on the SD card, notify you that the IP address has been assigned (likely 10.0.0.2), and do a pile of other things before eventually coming to a login prompt. Once you get to the prompt let the system sit for about two minutes then turn off the power. Now we can customize the operating system and configuration. If you do this before a successful boot you will likely cause a kernel panic or failed boot… so don’t do that!
Note that your eInk display will NOT activate during this boot. That’s completely normal, and no reason to panic. We just haven’t customized the configuration to set that up yet.
Device Customization
Remove the micro SD card and connect it back to your computer. On the /boot partition or drive (which may just be labeled “BOOT” depending on your OS) first create an empty file named “ssh”. On Windows just open Notepad and then choose File –> Save As… and save it to the top level of the BOOT drive. On Linux/Mac just navigate to where the BOOT partition mounted (e.g. /media/username/boot) and type:
root@system:~# touch /media/username/boot/sshNext, follow the guidance from the official Pwnagotchi configuration instructions on creating a config.toml file. I suggest the following as a file because I don’t like sharing information by default, and it’s best to change default credentials whenever possible:
main.name = "SuperCoolName"
main.lang = "en"
main.whitelist = [
  "EXAMPLE_NETWORK",
  "ANOTHER_EXAMPLE_NETWORK",
  "fo:od:ba:be:fo:od",
  "fo:od:ba"
]

main.plugins.grid.enabled = false
main.plugins.grid.report = false
main.plugins.grid.exclude = [
  "YourHomeNetworkHere"
]

ui.display.enabled = true
ui.display.type = "waveshare_3"
ui.display.color = "black"

ui.web.username = "Hacker"
ui.web.password = "Password"
The main things that get changed above are to specify the yet-to-be-created waveshare_3 display type, setting the name of the Pwnagotchi to “SuperCoolName” (change to whatever you’d like), disabling the global reporting (the grid), and changing the default web user interface username and password (which also should be changed from what I’ve put above). Once this is done unmount the partitions and reinsert the micro SD card into the Pi.
SSH Access
It’s time to boot again, and verify that we can access the system.
Follow the same steps previously laid out to boot the system. Watch as the boot occurs and you should see an IP address listed (likely 10.0.0.2). Make a note of this, as it’s the IP address of your Pwnagotchi on the hardwired port.
This time, you may also get a notice that a new device is available (depending on your operating system). For a Linux system you just need to add an IP address for the new interface that presents itself, such as the following (assuming “rpiintf” is the new interface):
root@system:~# ifconfig rpiintf 10.0.0.3 netmask 255.255.255.0For MacOS you can do something similar, and this post on Reddit covers it very well.
You should now be able to SSH directly to the device as follows:
user@system:~$ ssh pi@10.0.0.2You may get asked to accept the unknown key (go ahead, this is expected). After that, login with the password “raspberry”. Assuming that worked, go ahead and change that password. 🙂
pi@raspberry.local:~$ passwdNow would also be a great time to configure that RTC that we installed. Fortunately, Adafruit has a great tutorial on this so I don’t need to write anything else! Hint: the overlay command for the RTC I mentioned above is:
dtoverlay=i2c-rtc,pcf8523Also note that you will reboot at least once during this process, so you’ll have to SSH back in when that happens.
Log out (CTRL+D or just type exit and press enter until you’re completely out).
Verifying Web UI Access
Okay, so you have SSH access and you know that something is happening… but without the eInk display you have no way of knowing what, exactly, that might be. Let’s try the Web UI and see what’s going on!
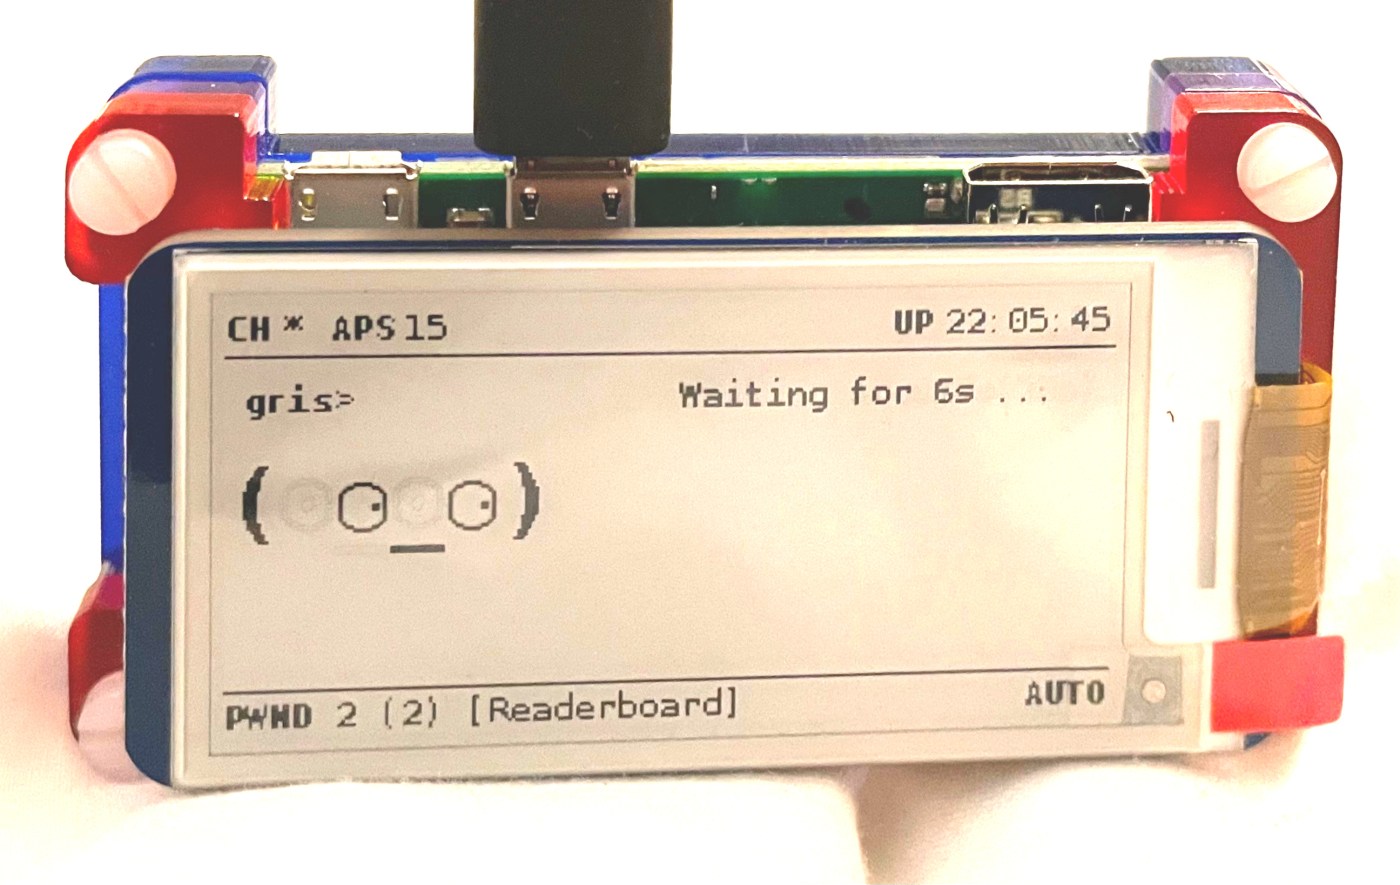
Open a browser and navigate to http://10.0.0.2:8080 and you should be prompted for a username and password. These are the values you set in that config.toml file (if you didn’t change them they are “Hacker” and “Password”). Once you’ve logged in you should be able to see your new friend doing, well, something. It will look something like this (I named mine “gris” instead of “SuperCoolName”):
If you’re seeing that just go ahead and click the “Shutdown” button on the bottom left. It’s not quite time yet, but we’re close!
Enabling Waveshare eInk V3
Now it’s time to enable the new eInk display. I completely lifted this from this comment in a pull request on the Pwnagotchi site, which contains all the files necessary. If you would prefer, the full ZIP file is also hosted on this site.
Download the file and extract the contents. You will see several files/folders, which we’ll use as follows:
- config.toml <– Delete this, not needed
- howto <– Delete this, not needed
- pwnagotchi.zip <– Extract this
The pwnaogtchi.zip file will extract a folder named… pwnagotchi. This is the one we need. The other partition of the micro SD card is named “rootfs” and is the entire filesystem that is not the /boot partition. If you’re on a system that can read this filesystem (e.g. Linux or Windows) just navigate to the /usr/local/lib/python3.7/dist-packages/ location and then drop the “pwnagotchi” directory over the existing one. From a command line this could also be done as follows (assuming the pwnagotchi.zip file is in /home/username and the mount point is /media/username/rootfs):
root@system:~# cd /media/username/rootfs/usr/local/lib/python3.7/dist-packages/
root@system:/media/username/rootfs/usr/local/lib/python3.7/dist-packages/# unzip /home/username/pwnagotchi.zip
### when prompted, select "A" to overwrite all files ###
You may be wondering why we didn’t just do all this via SSH… the short answer is that technically you CAN do it that way, but that runs the risk of messing up things while they’re running, so I prefer to do it directly via the micro SD card access rather than on the running system.
Final Boot
Once more, reinsert the micro SD card, connect the HDMI cable, and boot. This is the last time we’ll use the HDMI cable, because the goal this time is just to observe that everything starts correctly. Assuming it does, the eInk display will turn on after about 2-3 minutes (it will be faster in future boots) and your Pwnagotchi will finally be alive. Let it sit for about 15-30 minutes while all the libraries and files needed start to load, and you should see your new friend start doing their work!
Summary
This was a bit of work mostly because there wasn’t a single source that compiled everything together with all the requirements, but all the information was out there (as you can see from the frequent links in this posting). I’m sure others have solved this as well, or solved it better, but I wanted a quick reference “how to” for posterity. I’m hoping it helps others as well. Until next time… go hack something!


Leave a comment